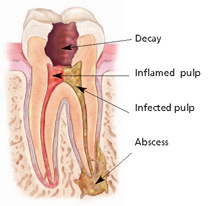

Endodontic treatment treats the inside of the tooth. Endodontic treatment is necessary when the pulp becomes inflamed or infected. The inflammation or infection can have a variety of causes: deep decay, repeated dental procedures on the tooth, faulty crowns, or a crack or chip in the tooth. In addition, trauma to a tooth may cause pulp damage even if the tooth has no visible chips or cracks. If pulp inflammation or infection is left untreated, it can cause pain or lead to an abscess.
How does endodontic treatment save the tooth?
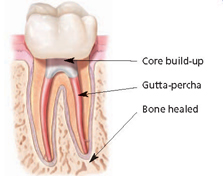
During root canal treatment, the inflamed or infected pulp is removed and the inside of the tooth is carefully cleaned and disinfected, then filled and sealed with a rubber-like material called gutta-percha. Afterwards, the tooth is restored with a crown or filling for protection. After restoration, the tooth continues to function like any other tooth.
Contrary to jokes about the matter, modern root canal treatment is very similar to having a routine filling and usually can be completed in one or two appointments, depending on the condition of your tooth and your personal circumstances. You can expect a comfortable experience during and after your appointment.
Saving the natural tooth with root canal treatment has many advantages:
• Efficient chewing
• Normal biting force and sensation
• Natural appearance
• Protects other teeth from excessive wear or strain
Endodontic treatment helps you maintain your natural smile, continue eating the foods you love and limits the need for ongoing dental work. With proper care, most teeth that have had root canal treatment can last as long as other natural teeth and often for a lifetime.
Endodontic (Root Canal) Treatment, Step By Step Preliminary treatment to remove the decay and the source of infection of the pulp is necessary, along with a determination of whether the lost tooth structure can be restored. If a fracture of the tooth has reached the pulp, or infection is associated with gum disease, it could be more difficult, if not impossible, to save the tooth. The general sequence of a root canal procedure is as follows:
Step 1
Local anesthesia is administered via injections to numb the tooth to be treated and the surrounding tissues. If the pulp in a tooth is acutely inflamed, and therefore very painful, it may take a while to get it numb, but your dentist will not start the treatment until it is.
Step 2
Dental dam in place, used to isolate infected tooth from the rest of mouth to facilitate root canal treatment. A dental dam — a thin sheet of rubber or vinyl — will be placed over the affected and adjacent teeth. The tooth undergoing treatment protrudes through a hole punched in the dam, isolating it from the rest of the mouth. This allows the root canal treatment to be carried out in a sterile environment free from contamination by bacteria found in saliva or the rest of the mouth.
Step 3
A small access hole is drilled through the biting surface of an affected back tooth or from behind a front tooth, allowing access to the pulp chamber and root canals for treatment.
Step 4
The diseased and dead pulp tissue is removed from the tooth with specially designed instruments used to clean out the root canals and pulp chamber. This is not painful; the area is numb and the tissue being removed is either dead or dying. Once the pulp, along with the nerves contained in it, is removed, the tooth itself can no longer feel pain.
Step 5
The canals are disinfected with antiseptic and antibacterial solutions.
Step 6
The canals are then shaped with tiny flexible instruments to allow them to receive root canal fillings and sealers. The canals are washed and cleaned again to remove root canal debris prior to sealing them.
Step 7
Root canal fillings are selected that will exactly fit into the freshly prepared canals. Usually a rubber-like material called gutta-percha is used to fill the canal space. It is a thermoplastic material (“thermo” – heat; “plastic” – to shape), which literally is heated and then compressed into and against the walls of the root canals to seal them. Together with adhesive cement called a sealer, the gutta-percha fills the prepared canal space. Sealing the canals is critically important to prevent them from becoming reinfected with bacteria.
Step 8
A temporary or permanent filling material will then be placed to seal the access hole that was made to treat the canals, and the dental dam is removed. If the tooth lacks sufficient structure to hold a restoration (filling) in place, the dentist or endodontist may place a post (either metal or a very strong plastic) in one of the canals inside the tooth to help retain it.
Step 9
Root canal filling material (gutta percha) is placed in the canals and the tooth is sealed with a temporary filling to protect it from contamination. Then a crown is usually placed over the tooth to seal and protect it from recontamination and future damage. After the procedure, an antibiotic may be prescribed to treat or prevent infection. Be sure to follow the instructions of your dentist or endodontist carefully. After-effects of treatment are minimal, generally lasting from a couple of days to about a week. It is normal to have some minor discomfort after treatment including slight soreness that can usually be managed with over-the-counter (aspirin, ibuprofen) medications or prescription (codeine-type) drugs, or a combination of the two.
Step 10
Your tooth will need a permanent restoration — a filling or a crown — to replace lost tooth structure, and provide a complete seal to the top of the tooth. Your endodontist will send you back to your general dentist to determine which type of restoration is best for you. This step is of particular importance since many studies show that if the filled root canals are recontaminated with bacteria from the mouth, there could be a recurrence of infection around the tooth.